Slapping Iron

Obscure technical documentation

  • Background

    In my previous post, I tried to fix TLE downloads in the most recent available version of gpredict on Debian 12. This works to some degree, but I noticed there can still be problems with satellites that have become non-operational (i.e. removed from the CelesTrak .cat files) since the satellite data was imported into the gpredict tree.

    One satellite in particular that was bothering me was METEOR M-1 (NORAD ID 35865). I could see that it was making passes overhead using my https://github.com/bxlentpartyon/satellite_passes script, but the timing/position of the passes seemed off.

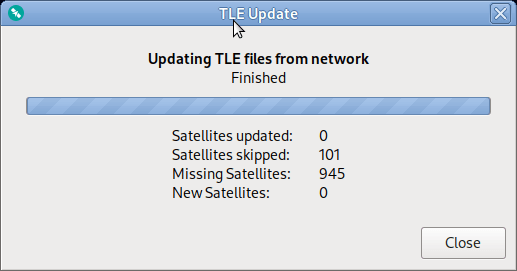
    It took me a while to figure this out, but the problem is that, when gpredict updates its TLE data, it downloads all of the latest “category” files, and then creates or updates individual .sat files for each satellite that it finds TLE data for in those files.

    That sounds simple enough, but what you don’t hear in there is anything about what happens if a satellite gets removed from the latest version of one of these “category” files. Well, in that case, we just leave whatever stale TLE data we currently had sitting around.

    I found that even when using the --clean-tle switch, these “stale” satellites don’t get removed. I added the following to ~/.config/Gpredict/gpredict.cfg to investigate futher:

    [LOG]
    LEVEL=4

    And it turns out at the we remove all the TLE data with this switch, but then puts it right back, from whatever shipped with the package:

    2025/03/16 22:52:13|3|clean_tle: Cleaning TLE data in /home/athorlton/.config/Gpredict/satdata
    2025/03/16 22:52:13|3|clean_tle: Removed 13403.sat
    2025/03/16 22:52:13|3|clean_tle: Removed 42785.sat
    2025/03/16 22:52:13|3|clean_tle: Removed 28932.sat
    .....
    2025/03/16 22:52:13|3|Copying satellite data to user config
    2025/03/16 22:52:13|3|create_sat_files: Found 979 satellites in /usr/share/gpredict/data/satdata/satellites.dat
    2025/03/16 22:52:13|3|create_sat_files: Written 979 new satellite to user config

    So that’s not useful for cleaning up stale data either…

    My next idea here was to try to completely blow away the ~/.config/Gpredict/satdata, but it also “properly” handles this by restoring the stock stuff as well:

    2025/03/16 23:02:50|3|Copying satellite data to user config
    2025/03/16 23:02:50|3|create_sat_files: Found 979 satellites in /usr/share/gpredict/data/satdata/satellites.dat
    2025/03/16 23:02:50|3|create_sat_files: Written 979 new satellite to user config
    2025/03/16 23:02:50|3|Copying satellite categories to user config
    2025/03/16 23:02:50|4|create_cat_files: Successfully copied iridium.cat
    2025/03/16 23:02:50|4|create_cat_files: Successfully copied science.cat
    2025/03/16 23:02:50|4|create_cat_files: Successfully copied cubesat.cat
    .....

    Super convenient.

    Solution

    One sort of obvious thing that does actually work here is to just remove the .sat file from ~/.config/Gpredict/satdata for anything that you observe to be stale, but this obviously isn’t ideal, as it’s not really obvious at a glance that something is wrong. I only caught these issues by comparing stuff directly with N2YO in real time.

    Looking at the source for the function that keeps putting everything back gave me another idea:

    src/first-time.c:
    635     /* check if there already is a .sat and .cat in ~/.config/... */
    636     datadir_str = get_satdata_dir();
    637     datadir = g_dir_open(datadir_str, 0, NULL);
    638     while ((filename = g_dir_read_name(datadir)))
    639     {
    640         /* note: filename is not newly allocated */
    641         if (g_str_has_suffix(filename, ".sat"))
    642             have_sat = TRUE;
    643         if (g_str_has_suffix(filename, ".cat"))
    644             have_cat = TRUE;
    645     }
    646     g_free(datadir_str);
    647     g_dir_close(datadir);
    648 
    649     if (!have_sat)
    650         create_sat_files(error);
    651 
    652     if (!have_cat)
    653         create_cat_files(error);

    The check here is literally just to see if there’s something called <blah>.sat and something called <blah>.cat in the satdata directory, so blowing everything away, and creating two dummy files in there, like this:

    cd ~/.config/Gpredict/satdata
    rm -rf *
    touch hack.sat
    touch hack.cat

    Will actually achieve something close to what I was after here. If you do this, then start gpredict, you should see that there are no satellites to track now.

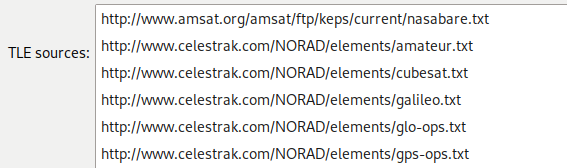
    At this point, running a regular TLE update, i.e. Edit -> Update TLE data from network will pull in all the valid TLE data from your provided URLs (I discussed correcting these for Debian in Part 1 of this blog). After that, if you restart gpredict, you’ll be running with only fresh, valid TLE data from CelesTrak.

    This might leave you asking “well what if I want actual updated TLE data for stuff that has fallen out of the .cat files?” Which is a completely fair question, and was originally my goal here…

    Unfortunately, that’s a bit more complicated problem to solve, since gpredict really seems to expect to be fed links from https://celestrak.org/NORAD/elements/, and there doesn’t appear to be a good “give me everything” link on there. I’m still poking around looking for a hack to address this, but the real answer is probably to just update gpredict itself to be more clever.

    +
  • FOREWORD

    I learned, after getting the stuff below working, that this isn’t quite enough to get things working to my liking. There can still be extremely stale TLE data laying around after tweaking the TLE URLs. Please see Part 2 for an additional fix that cleans things up even better.

    Problem

    I installed gpredict tonight on Debian 12, and found that, while the Gpredict version appears to be up to date, the URLs for the TLE data are not.

    Here’s what I’m seeing after a fresh install of Gpredict, under Edit -> Preferences -> TLE Update:

    A quick look around online shows that http://www.celestrak.com has moved to http://www.celestrak.org, quite a while ago, I think.

    Anyway, you can see when you try to update your TLE data using these sources, that it misses a lot of stuff (everything?):

    Root Cause

    I was curious about how this is so outdated, so I dug around a bit. It turns out that the TLE URLs are actually hard-coded in src/sat-cfg.c in the gpredict repo:

    229     {"TLE", "URLS",
    230      "http://www.amsat.org/amsat/ftp/keps/current/nasabare.txt;"
    231      "http://www.celestrak.com/NORAD/elements/amateur.txt;"
    232      "http://www.celestrak.com/NORAD/elements/cubesat.txt;"
    233      "http://www.celestrak.com/NORAD/elements/galileo.txt;"
    234      "http://www.celestrak.com/NORAD/elements/glo-ops.txt;"
    235      "http://www.celestrak.com/NORAD/elements/gps-ops.txt;"
    236      "http://www.celestrak.com/NORAD/elements/iridium.txt;"
    237      "http://www.celestrak.com/NORAD/elements/iridium-NEXT.txt;"
    238      "http://www.celestrak.com/NORAD/elements/molniya.txt;"
    239      "http://www.celestrak.com/NORAD/elements/noaa.txt;"
    240      "http://www.celestrak.com/NORAD/elements/science.txt;"
    241      "http://www.celestrak.com/NORAD/elements/tle-new.txt;"
    242      "http://www.celestrak.com/NORAD/elements/visual.txt;"
    243      "http://www.celestrak.com/NORAD/elements/weather.txt"},

    This has been updated by commit 2103b2c4a6aadbbdad326f2a9d1de49e6032f094 (“Changed top-level domains of CelesTrak TLE URLs”) in the master branch, but the Debian build clearly doesn’t have this commit

    Fix

    This is relatively easy to fix. The obvious solution is to just delete/re-add each entry in the TLE update menu, but there’s a bit of a faster way.

    It appears that if you edit just one TLE URL manually, it spits them all into .config/Gpredict/gpredict.cfg, where they’re much easier to edit.

    So, what I did here was to update one entry to “celestrak.org” and the click OK/exit the program. Once you do this, your gpredict.cfg file will get a line like this:

    URLS=http://www.amsat.org/amsat/ftp/keps/current/nasabare.txt;http://www.celestrak.com/NORAD/elements/amateur.txt;http://www.celestrak.com/NORAD/elements/cubesat.txt;http://www.celestrak.com/NORAD/elements/galileo.txt;http://www.celestrak.com/NORAD/elements/glo-ops.txt;http://www.celestrak.com/NORAD/elements/gps-ops.txt;http://www.celestrak.com/NORAD/elements/iridium.txt;http://www.celestrak.com/NORAD/elements/iridium-NEXT.txt;http://www.celestrak.com/NORAD/elements/molniya.txt;http://www.celestrak.com/NORAD/elements/noaa.txt;http://www.celestrak.com/NORAD/elements/science.txt;http://www.celestrak.com/NORAD/elements/tle-new.txt;http://www.celestrak.com/NORAD/elements/visual.txt;http://www.celestrak.org/NORAD/elements/weather.txt

    From here, it’s easy to fix all the URLs up at once with a command like this:

    sed -i 's/celestrak\.com/celestrak\.org/g' ~/.config/Gpredict/gpredict.cfg

    (You should probably back up your original gpredict.cfg before trying this)

    Now you can re-launch gpredict, and confirm that the entries are correctly updated the TLE Update Preferences tab. After that, you can attempt to update your TLE data again.

    This time you should see a much more sane result:

    +
  • Overview

    At some point recently, Dolphin decided to corrupt my memory card file with some fairly old saves on it. I’m going to build/use GerbilSoft’s mcrecover to fix this.

    I’m doing this on Oracle Linux 9, but the instructions should apply to most common flavors of Linux.

    Building MCRecover

    This is about as simple as it gets. I just cloned it and built it:

    https://github.com/GerbilSoft/mcrecover.git
    cd mcrecover
    mkdir build
    cd build
    cmake ..
    make -j 8

    This was on an OL9 system, where I’ve already built a bunch of other stuff, so you may need to install some dependencies to get the cmake step to succeed.

    Copy Database Files to Appropriate Location

    This bit took me a minute to figure out. If you’re not going to run a make install here, you need to copy the database XML files out of the source repo to a .config directory. I don’t generally run a bare make install on my systems, because then you’ve got software laying around that your package manager isn’t aware of.

    If you don’t do this part, mcrecover will throw an error that says:

    No GCN MemCard file databases were found.

    Along with some info about where to copy the databases. It wasn’t immediately obvious where to acquire these databases, and the couple forum posts that I found about this were at least a decade old:

    https://gbatemp.net/threads/gcn-memcard-recover.349406/

    https://gbatemp.net/threads/gamecube-memory-card-corrupt.367902/

    This is easily fixed, but I felt like it was worth a quick write-up, since it took me a bit to figure out. Anyway, you can fix this by doing the following before starting mcrecover:

    cd <mcrecover_git_repo>
    mkdir -p ~/.config/mcrecover/data
    cp data/*.xml ~/.config/mcrecover/data/

    At this point, you should be able to run mcrecover from the build directory, i.e. <mcrecover_git_repo>/build/bin/mcrecover, open your memory card image file, and attempt to recover saves from the image with the “Scan the memory card image for lost files” (magnifying glass) button at the top of the window.

    Unfortunately, I went through all of this only to discover that there was nothing to be recovered from my corrupted memory card image.

    A for effort anyway…

    + ,
  • BACKGROUND/Basic Setup

    I’ve had to install MATE on three OL9 systems now, so I figure I should properly document it. I’m reproducing this on a freshly installed OL9 VM, from this image:

    https://yum.oracle.com/ISOS/OracleLinux/OL9/u5/x86_64/OracleLinux-R9-U5-x86_64-boot-uek.iso

    I’ve chosen the basic “Server with GUI” installation just to get the majority of the packages I want installed, even though I don’t plan to use the default GNOME GUI.

    I’ll mostly follow the Rocky Linux instructions from here:

    https://docs.rockylinux.org/guides/desktop/mate_installation/

    Package Installation

    First we need to install the epel-release package to get the EPEL repo enabled:

    sudo dnf install epel-release

    Now we can install the remaining packages. I’ve broken out the list, just to make it easier to see what all is getting installed:

    sudo dnf install \
        NetworkManager-adsl \
        NetworkManager-bluetooth \
        NetworkManager-libreswan-gnome \
        NetworkManager-openvpn-gnome \
        NetworkManager-ovs \
        NetworkManager-ppp \
        NetworkManager-team \
        NetworkManager-wifi \
        NetworkManager-wwan \
        adwaita-gtk2-theme \
        alsa-plugins-pulseaudio \
        atril \
        atril-caja \
        atril-thumbnailer \
        caja \
        caja-actions \
        caja-image-converter \
        caja-open-terminal \
        caja-sendto \
        caja-wallpaper \
        caja-xattr-tags \
        dconf-editor \
        engrampa \
        eom \
        firewall-config \
        gnome-disk-utility \
        gnome-epub-thumbnailer \
        gstreamer1-plugins-ugly-free \
        gtk2-engines \
        gucharmap \
        gvfs-fuse \
        gvfs-gphoto2 \
        gvfs-mtp \
        gvfs-smb \
        initial-setup-gui \
        libmatekbd \
        libmatemixer \
        libmateweather \
        libsecret \
        lm_sensors \
        marco \
        mate-applets \
        mate-backgrounds \
        mate-calc \
        mate-control-center \
        mate-desktop \
        mate-dictionary \
        mate-disk-usage-analyzer \
        mate-icon-theme \
        mate-media \
        mate-menus \
        mate-menus-preferences-category-menu \
        mate-notification-daemon \
        mate-panel \
        mate-polkit \
        mate-power-manager \
        mate-screensaver \
        mate-screenshot \
        mate-search-tool \
        mate-session-manager \
        mate-settings-daemon \
        mate-system-log \
        mate-system-monitor \
        mate-terminal \
        mate-themes \
        mate-user-admin \
        mate-user-guide \
        mozo \
        network-manager-applet \
        nm-connection-editor \
        p7zip \
        p7zip-plugins \
        pluma \
        seahorse \
        seahorse-caja \
        xdg-user-dirs-gtk

    Installing LightDM

    You can use MATE with the default GDM, but I have switched to lightdm on all of my machines. I don’t remember why at the moment, but I think it had something to do with wanting to be able to change the greeter…

    Anyway, you can install lightdm with:

    sudo dnf install lightdm-settings lightdm

    That is also covered in the Rocky Linux instructions, but they don’t cover actually getting lightdm working:

    sudo systemctl disable gdm
    sudo systemctl enable lightdm

    I generally reboot after all of this, to make sure that everything has properly taken effect.

    +